
AO Maps in XPS
AO Maps, which is short for Ambient Occlusion maps, also often falsely refered to as 'lightmaps', are a texture type used to create consistent shading on the model. The shadows it creates are static 'baked' onto an image texture.
In older games up to the previous console generation, AO maps had often been multiplied over the Diffuse textures. However as shaders evolve now, most of the time Diffuses have changed into so called 'Albedo maps' (which basically are just diffuses without AO lol) and they lack this shading information.
A brief overview of how XPS calculates AOs into its shader:
Basically AOs get multiplied over diffuse and specular maps. They do not influence normal maps, and cannot be used in Render Groups that have Environment or Emission maps.
Diffuse + AO = Model Color
Specular + AO = Specular Intensity and Color
Why does it get multiplied over Specular maps aswell? The answer is simple. When something is in shadow, it doesn't reflect anything. Put a glass into a completely black room, does it shine? I
bet you 100% it doesn't.
No light = No shine.
So why do AOs matter for models?
In short, models look really, really flat without them. And even though old games often already have these somehow worked into their Diffuses, a lot of shading info is mostly still not looking too great. Here are two example gifs about the difference AOs make to the overall look of a model:
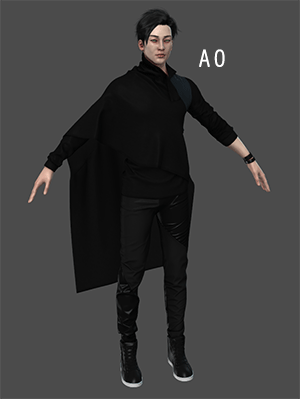
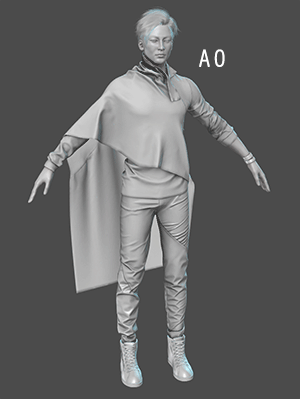
The difference might look subtle at first, but you see that shading gives a bit of depth to a model that would otherwise look relatively flat.
You know what's the best? A lot of recent games actually have AO maps already somewhere in their textures (not all, but many).
How do you identify one?
This is easier than you'd expect. With the knowledge that AOs basically just catch shadows you can look out for exactly that. Search for a white texture, then look at it and see if you see any sort of shading casted onto it. Looking at the Diffuse might help so you have better orientation on where shadows could be.

Here for example is the Diffuse of the above model.
I have marked red dots next to the parts that are up, around the hips area.
If you imagine any shading happening on the pants, you will probably imagine that the shirt will cast some shadows, the cape and the pants itselves.
Now imagine a relatively bright white image and it has these shadows on it. Around the hip part should by logic be a lot of shadow.
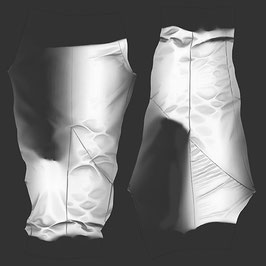
This is the AO map for the pants.
You can clearly see the dark shaded areas where the cape would be, also you see that the tops are covered by shirt shadows and around the bottom, there are shadows from the shoes.
This type of texture is what you look out for.
Note: Sometimes people confuse the Blue Channel of Normal Maps as AO maps. In 99% of cases (the only i ever saw was Mortal Kombat games) this is VERY VERY UTTERLY WRONG. Don't do it.
(the blue channel of a normal map has a different function, but that's talk for another day)
Are there meshes/models that do not need AOs?
Personally I say ''Always bake AOs!!!'' even for games that look like it's already on their diffuses. By how XPS' shader works, AOs will still manage to improve the model's look, however here are the exceptions on which i personally find AOs look really stupid:
- Hair meshes (this in 90% of cases, unless it's stylized hair like Life is Strange, it does not work anyway so don't try)
- Any sort of meshes that are mainly alpha channeled (fur, feathers,...), this happens a lot on older games
- Models from Anime styled games (there are exceptions to this, which are HD games like Future Tone, as it makes use of other additional texture types.)
- Final Fantasy XIII models, honestly this just looks stupid, don't. DO on other FF games tho!
Yeah, okay Crofty, can you please finally tell me how to make my own?
There's no use in me telling you what to do if you don't understand what you are doing. I however hope you do now.
So buckle your seatbelts, we gonna bake us some AO maps!
Pre-baking: Make sure you exported your finished model before baking! Make a new Blender Scene and import your finished model. Make sure your Renderer is 'Blender
Render' NOT Cycles.

Step 1: Load your model into Blender, hide the Skeleton and switch to Textured mode. Also split your Blender to have an interface like this.
Marked Red are the buttons you have to select to get these windows to display.
Marked Blue are mesh parts that have Transparency with an Alpha Channel. These meshes need to be deleted!
Baking AO does NOT take transparency into account, so it would bake the shape of these meshes instead.

Step 2: Select one of the remaining meshes, here we use the pants, and enter Edit Mode. You will see the UV showing up in the Image Editor on the right.
Click on Image > New Image and the popup will show up. Make this image 1024 x 1024 pixels, deselect the 'Alpha' box (AOs should NOT have alpha!).
Hit Ok and new image will be created.

Step 3: Now switch to the 'World' tab.
- Enable Ambient Occlusion
- Set Gather to Raytrace and the samples to 12.
Samples define the quality of the outcome. The higher the samples, the less noisy your AO map will be, however this also means increased render times. 12 is a great sample value to go with the AO
Correction Actions inside my Lazy Tools package.
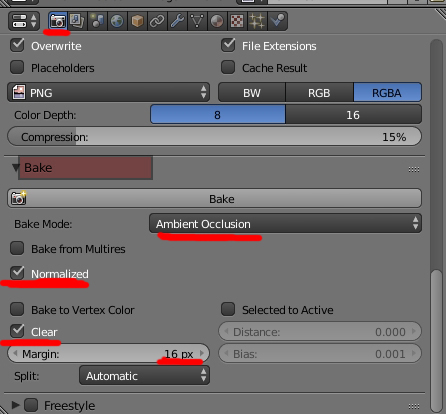
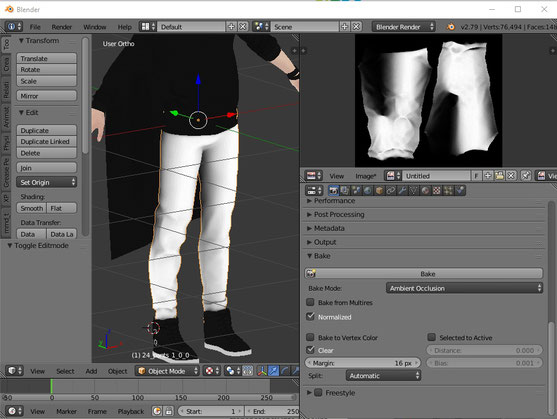
Step 4: Now switch to the 'Render' tab.
Navigate to a section called 'Bake'.
- Bake Mode to Ambient Occlusion
- Set to Normalized (if you don't, it'll be dark grey and not useable)
- Clear, will make sure the image is completely new
- Margin: Stretches the texture a bit outwards by a value of 16 after finished baking. This ensures that there will not be black seams at the UV borders, which would possibly
cause black lines on your model. The higher the value, the bigger the stretch.
Now press that big 'Bake' button!
Step 5: After just a few seconds you will see your AO map in the Image Editor and on your model.
Now go to Image > Save as Image
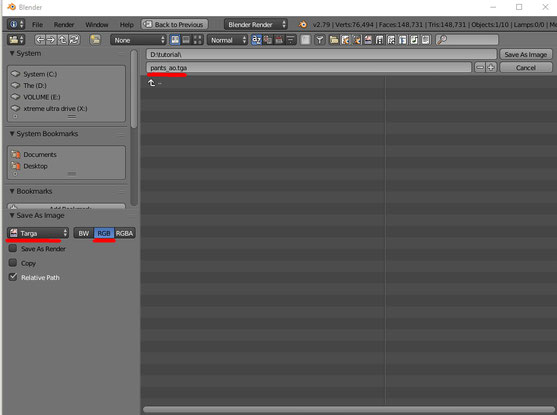
Step 6: Navigate to your model's folder and save the image with _AO extension. Make it a Targa (tga) image and save only RGB (NOT RGBA).
After this, the Blender step is done!
Just discard of this scene and model, we don't need it anymore.
Off to Photoshop we go---------
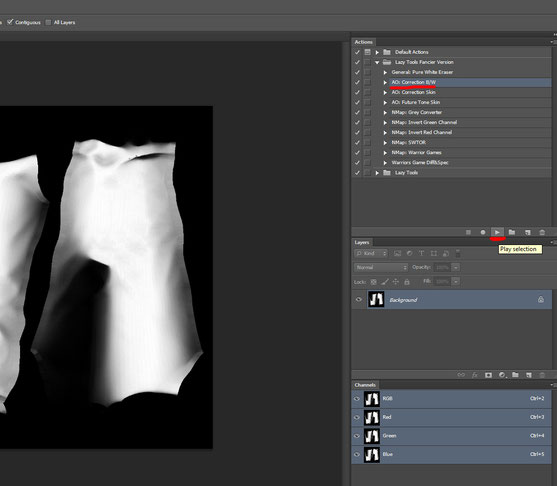
Step 7: Open the texture in Photoshop.
Check the Actions tab, click on AO: Correction B/W from the Lazy Tools Action set and then the small play button.
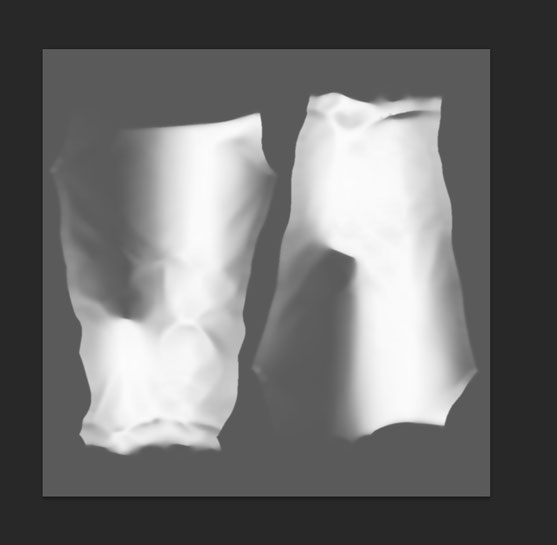
Step 8: This is your final AO you can apply in XPS, Blender or whatever.
If you ask why it's brighter than the raw export: Ultra black shadows look kinda ....eh in XPS.
'Less sometimes is more'
Appendix: Why add pink color to skin AOs?
The simple answer to the question is: Your skin will look pretty dead if you don't. Here is an example gif of default vs pinkish. To get the pinkish effect just use the AO correction action for skin instead. If your skin shares texture with cloth, cut them out properly.
Do not add skin color to clothes!
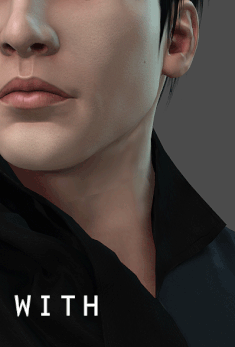
You can see that the difference is subtle.
But a pink hue makes skin feel more alive,
than real grey shadows.
Well hey! You reached the end of this tutorial! \(^~^)/ Congratulations! Questions on Discord please!
All information used here is based on years of trial and error and a couple of really nice articles I am unable to find because it's been ...well years. Deep apologies for that T_T